How do I test my Fire Alarms?
The best way to protect yourself, others, and your property from fire is to ensure you have working fire alarms. Performing a regular fire alarm test is crucial for fire safety and helps to save lives. Maintaining your fire alarm system is important, as overtime, fire alarm batteries can become depleted or be disconnected, as well as experience general wear on the fire alarm over time.
How often should fire alarms be tested?
No matter the type of fire alarm you have, we recommend that testing happens monthly to ensure everything is working correctly. It is also advised that fire alarm batteries are replaced once or twice a year if required.
Testing can be different depending on the alarm power source. Standalone battery-powered alarms rely solely on one source, which is their internal battery. This battery may be sealed in or replaceable, depending on the grade of alarm. A hardwired alarm is powered by your home’s electrical system, but can also contain built-in or replaceable batteries for back-up power. This means that if the home’s electrical system was to fail in an event of a fire, the alarm would still have the power to detect fire and alert the household. Both types should be tested monthly to ensure continuous detection, but testing battery-powered alarms monthly should be essential due to them relying solely on the battery to operate.
By testing an alarm system it will ensure that the alarm you are testing from is sounding, as well as any other interlinked alarms in the property.
How to test if a fire alarm is working?
You should always check the manufacturer’s guide for testing your fire alarm. Generally, both battery-powered and hardwired fire alarms can be tested in one of the following ways using the fire alarm test button or control switch. We delve into each fire alarm check method below:
Using the fire alarm testing button:
- Check that the solid green light on the alarm is on (this shows that it is receiving mains power).
- Press and hold the ‘Test’ button for 10 seconds.
- The alarm will sound loudly, so that you know the alarm is functioning.
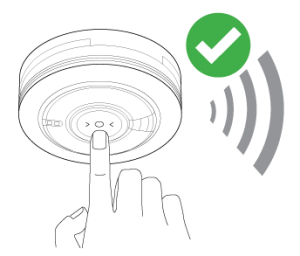
- If you have other alarms in the property, they should be linked together. This means that if one alarm sounds, it will send a signal to trigger the other alarms in the property – so you can hear them sound in the background.
- Finally, repeat the above steps on all the other alarms in the property.
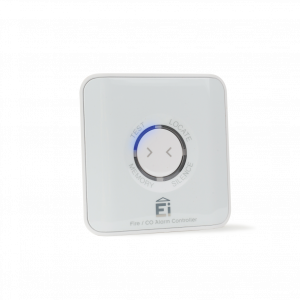
Using a control switch:
- Press the ‘Test’ button on the alarm controller.
- All of the alarms in the property will sound loudly, confirming the alarms are interlinked and functioning correctly.
- If you are using the Ei450, this will continue for as long as you hold down the ‘Test’ button.
- If you are using an Ei1529RC or Ei412 you will need to flick the ‘Test’ switch off to finish the test.
How not to test your fire alarms
We do not recommend for smoke or heat alarms to be tested using real smoke or test spray. Doing so can set fire to the alarm itself and damage the property. The results of testing with real heat or smoke are misleading unless effective apparatus is used. We recommend testing only via the alarm’s test button or a test switch – physically activating the sensor can wear it out and cause issues in the future.
Key considerations when testing fire alarms
When testing fire alarms, it is important that the sounder is loud and can be heard from far away or even from outside the building. An alarm system should be capable of alerting everyone on the premises, no matter their location. If an alarm’s battery is depleting or power to the mains has been affected, the sounder may not be as loud as usual.
How do I test my Carbon Monoxide Alarms?
With Carbon Monoxide (CO) being a colourless, tasteless and odourless gas, it’s vital to have a working CO alarm to ensure constant detection. The installation of a device is not enough – it’s critical to ensure it is working and fully functional.
Why Test Carbon Monoxide alarms?
Carbon Monoxide is the result of the incomplete combustion of fuels such as gas, oil, coal and wood. Prolonged exposure to the gas can cause Carbon Monoxide poisoning and symptoms such as headaches and nausea, and can in some instances be fatal.
Where a room contains a fuel-burning appliance, a CO alarm should ideally be ceiling mounted, sited 300mm from any walls and obstructions, within 1-3m horizontally from the appliance. Discover more alarm siting tips within your premise. As the gas is colourless, tasteless and odourless, it can be difficult to detect a Carbon Monoxide leak, so having a detector in place will alert of the earliest signs.
The maximum allowable concentration for continuous exposure in any 8 hour period according to OSHA is 35ppm (parts per million). A CO alarm will alert of high levels of the gas from 50ppm. A CO alarm will detect abnormal gas levels from 50ppm and progressively alert as levels reach 100ppm and 300ppm. These progressive beeping patterns are able to alert a household when the situation is getting worse.
How often should Carbon Monoxide alarms be tested?
We recommend that CO alarms are tested monthly to ensure everything is working correctly.
Both mains-powered and battery-powered alarms should be tested monthly to ensure constant detection. With CO not having a scent, colour or taste, it’s vital to check that these devices are continuously monitoring CO levels to keep residents safe at all times.
How to check if a Carbon Monoxide alarm is working
A Carbon Monoxide alarm should be tested using the device’s test button or via a test switch.
CO alarms should not be tested using candles or test spray. Doing so may damage the alarm itself or the property. The results of testing with a candle or CO gas are misleading unless particular effective apparatus is used.
Carbon Monoxide alarms have different beeping patterns to smoke and heat alarms. Our Carbon Monoxide alarms beep three times with a pause repeatedly during activation. The same occurs with our multi-sensor alarms, so that you can tell what type of activation is happening.
The importance of regularly testing Carbon Monoxide alarms
As carbon monoxide is a odourless, colourless and tasteless gas, it is essential to ensure that CO alarms are working as they should. Having a working CO alarm is vital to alert a household in the event of a CO leak and prevent health issues caused by high CO exposure.
Why is my alarm beeping?
Never ignore a beeping smoke alarm, heat alarm or Carbon Monoxide (CO) alarm, as it is a warning sign of either danger or that an alarm needs maintenance.
Why is my alarm beeping?
There are a variety of common reasons that an alarm can beep.
Fire alarm chirps can signify an alarm fault, electrical problem, lifetime reached or a low battery. The alarm should be investigated no matter the type of beep, to ensure protection. The alarm head should not be taken off the base and left idle as a result of annoyance caused by beeping.
Smoke and heat alarms have different activation sounds to Carbon Monoxide alarms to distinguish between the types of emergency.
Reasons why smoke and heat alarms may be beeping
When not emitting a continuous chirp, your smoke alarm could be beeping for a variety of reasons. With 3000 Series and 600 Series devices, one chirp and a yellow flash every 48 seconds indicates that the backup battery is low. Two chirps and two yellow flashes every 48 seconds could imply that there is a fault with the sensor, in which case you should replace the alarm. Three beeps and three yellow flashes every 48 seconds indicates that the device has reached the end of its life and needs to be replaced.
All of our smoke alarms come with built-in dust compensation technology to avoid contamination build up in the optical chamber, whether that be by insects or dust. When maximum dust compensation level has been reached, our smoke alarms will beep four times and flash yellow four times every 8 seconds.
Our heat alarms respond to heat build-up, triggering at 58°C. The heat alarms follow the same chirping patterns as the smoke alarms and will not be affected by smoke or cooking fumes.
Reasons why Carbon Monoxide alarms may be beeping
When a CO alarm detects abnormal levels of CO, the red LED will flash and emit three long beeps with a pause, repeatedly. The maximum allowable concentration for continuous exposure in any 8 hour period according to OSHA is 35ppm (parts per million). A CO alarm will alert of high levels of the gas from 50ppm.
Troubleshooting different types of fire alarm sounds
Smoke and heat alarms have different activation sounds to Carbon Monoxide alarms to distinguish between the types of emergency. Ensure you are able to take the appropriate action for the correct alarm sound through the section below.
What does a continuous fire alarm mean?
When a smoke or heat alarm emits a continuous beep, or a Carbon Monoxide alarm emits three long beeps and a pause, there may be a fire or dangerous levels of Carbon Monoxide present. If in doubt, always assume there is a real fire or CO emergency and take the necessary action. You should evacuate the property and be absolutely sure that it is safe to enter before returning.
If there is no fire present:
- Find the alarm with the red light rapidly flashing. Press its ‘Hush’ button to silence. Clean the alarm using a vacuum.
- Are there any cooking fumes or steam around? This could be the reason behind the alarm fault – if so it may be incorrectly sited or the wrong sensor type for the area. Read our alarm siting guide, to ensure correct placement of your alarms.
A heat or smoke alarm beeping every 30 seconds to a minute:
- If it is a regular single beep (approximately once every minute), then the battery may be running low, and you may need to change the battery in the alarm. This is relevant for the 140RC Series alarms.
- If the green power light is off – contact your installer or an Expert Installer to check alarm wiring & connections.
A fire alarm that keeps chirping sporadically:
- The alarm may be contaminated from dust or insects. Clean the alarm using a vacuum and retest the system.
- There may be an issue with the wiring – contact your installer or an Expert Installer to check wiring and connections.
- The source of the beeping could be a completely different device such as a clock, washing machine, or hidden Carbon Monoxide alarm.
Why is my Carbon Monoxide alarm beeping?
Carbon Monoxide alarms have different beeping patterns to smoke and heat alarms. Our Carbon Monoxide alarms beep three times with a pause in a CO emergency. The same occurs with our multi-sensor alarms, so that you can tell what type of emergency is happening.
If a Carbon Monoxide alarm is sounding:
- There is likely to be Carbon Monoxide present. Turn off any gas appliances, open windows and doors and leave the property.
- Ring the emergency number of the gas/fuel supplier.
- Do not enter the property until the alarm has stopped.
- If the alarm contains AudioLINK+ – Once the alarm has stopped activating and it is safe to enter the property extract a report to identify the details of the incident.
A Regular single beep or irregular beep from a Carbon Monoxide alarm:
- If the green light is off, contact your installer or an Expert Installer to check the wiring & connections (mains powered alarm).
- If the alarm contains AudioLINK+ – extract a report to identify the details of the incident.
If a CO alarm detects 50ppm, the red LED will flash twice every 4 seconds, and the alarm will sound within 60-90 minutes of exposure being at that level. When CO gas levels are at 100ppm, the red LED will flash three times every 4 seconds when exposed and the alarm will start sounding within 10-40 minutes. At 300ppm, the red LED flashes four times every 4 seconds, with the alarm sounding within 3 minutes. These progressive beeping patterns are able to alert a household when the situation is getting worse.
How do I change a fire alarm battery?
Fire alarms are one of the most effective ways of keeping safe and avoiding getting caught in a fire. These alarms are capable of alerting a property in the event of a fire emergency, constantly monitoring for environmental changes.
Why is it important to change a fire alarm battery?
Changing the batteries in fire alarms in essential for constant monitoring within a property. Particularly with battery-operated devices which rely on a single source of power, these devices should be checked monthly to ensure they are operating with enough power and at full capacity. Fire alarms that are mains powered often have a battery inside as a back-up power supply. In this case, when access to the mains power is limited, the device will use the back-up battery in place to continue monitoring conditions for a short period of time. For example, if in the event of a fire the mains was unable to reach the device, it would still be able to alert the household with the power from its battery.
How do I know if my alarm battery needs changing?
Our 140e Series alarms have a replaceable battery. When its battery is low, the alarm will beep once every 40 seconds with a red LED flash.
You will know when you need a battery replacement, as you will hear a single regular beep (low battery warning) coming from the alarm. However, it is recommended that you change the battery every year.
What batteries do fire alarms use?
Our 3000 Series alarms have a 10-year lithium cell battery built-in and will not need to be changed at any point during the device’s lifespan. Our 140e Series contain a 9V Alkaline battery as its backup power supply and will need changing across the lifespan of the alarm.
How to change a fire alarm battery
Steps for changing the battery in our 140e Series
- Turn off the mains power to the alarm. The green light on the alarm should go out.
- Insert a flat headed screwdriver into the removal slot of the alarm. This is marked with an arrow. Make sure you keep the screwdriver horizontal (i.e. parallel to the ceiling).
- Slide the alarm off its base and you should be able to see the 9V battery in the back.
- Replace the battery in the back of the alarm with a 9V Alkaline battery – we recommend Duracell MN 1604 or Energizer 522 as new batteries. Take care with the battery clip and wires as damage to these will result in constant beeps, meaning that the unit will need to be replaced.
- Slide the alarm back on its base.
- Turn the power back on. The green light on the alarm should come back on.
- Finally test the alarm to ensure the unit is working correctly.

This is relevant for the following products – Ei141RC Ionisation Smoke Alarm, Ei144RC Heat Alarm, Ei146RC Optical Smoke Alarm.
Testing the fire alarm
Once the battery has been replaced, we need to test the fire alarm to ensure that the replacement battery is working as it should, using the alarm’s test button or a test switch. More information on testing your alarms can be found in the How To Test Fire Alarms FAQ.
Check fire alarm batteries regularly
It’s important to test your alarms monthly to ensure that they are sounding, detecting and interlinking correctly.
How do I check the age of my alarms?
Most of our alarms have a 10-year life, after which they should be replaced to ensure coverage.
Checking the date-code label:
All Aico alarms have a date-code label on the side of them which tells you exactly when the alarm was made and also the recommended replacement date.
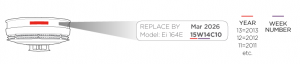
The four-digit code shows you the year and week that the alarm was made. The first two digits relate to the year and the second two digits relate to the week.
Above this is the ‘Replace By’ date, but note that the date on the label shows the maximum life of the alarm and alarms should always be replaced before their life is up.
Replacing your alarm:
If your alarm is coming up to its replace by date, it should be replaced. The first step is to find out the model number of the alarm that you have installed. Once you know the model number for the alarm that you need to replace, you can use the ‘Find A Distributor’ section to find the details of your nearest verified stockist who will be able to provide a replacement alarm.
What alarm do I have?
Alarm identification can sometimes be difficult as some alarms can look quite similar, but there are a few ways that you can tell them apart. We have also highlighted a few of the most popular products.
Model number
The model number of each alarm and accessory is noted on the side of the product, along with the age and replace by date. You can type this number into the search bar above to find out all the details of your alarm.

Identification by Range
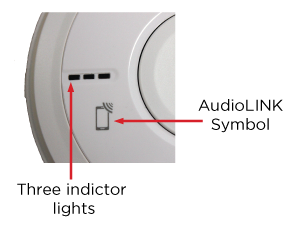
All alarms within the 3000 Series are mains powered with 10-year rechargeable lithium cell back-up and fit onto easi-fit bases. All 3000 Series alarms are compatible with SmartLINK using the Ei3000MRF SmartLINK Modules. 3000 Series alarms can be identified by the three indicator lights and AudioLINK symbol.
Which 3000 Series Alarm do I have?
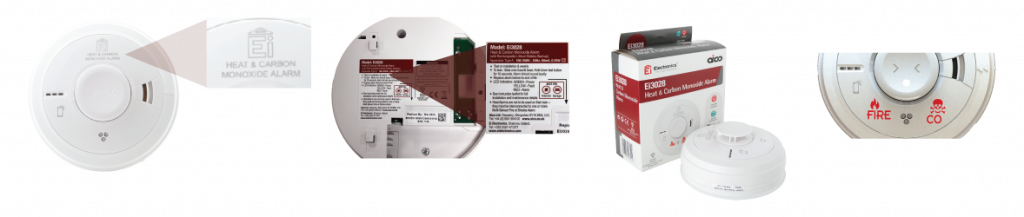
- Ei3028 Multi-Sensor Heat & CO Alarm – contains heat and Carbon Monoxide sensors.
- Ei3024 Multi-Sensor Fire Alarm – contains Heat and Optical sensors.

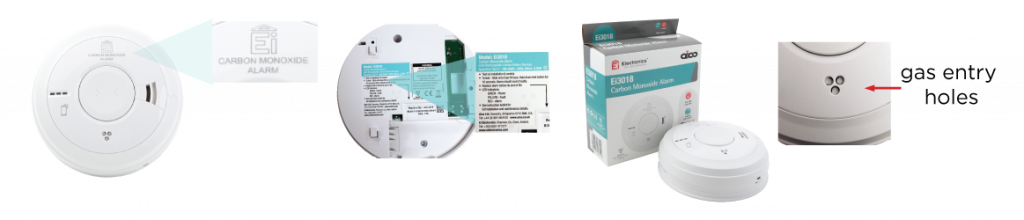
- Ei3018 Carbon Monoxide Alarm – contains a single Carbon Monoxide sensor.
- Ei3016 Optical Alarm – contains a single Optical sensor.

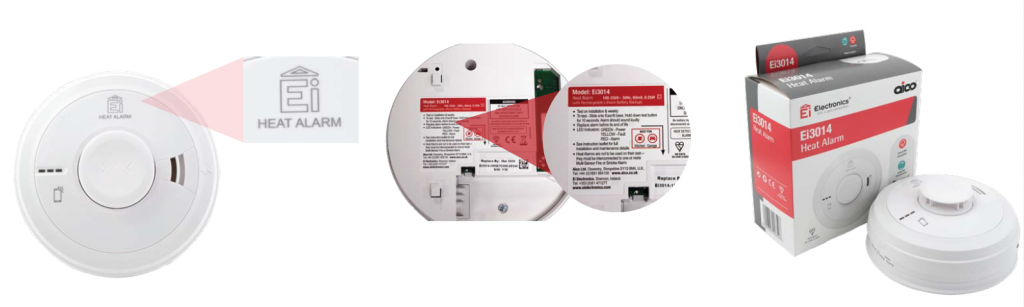
- Ei3014 Heat Alarm – contains a single Heat sensor.
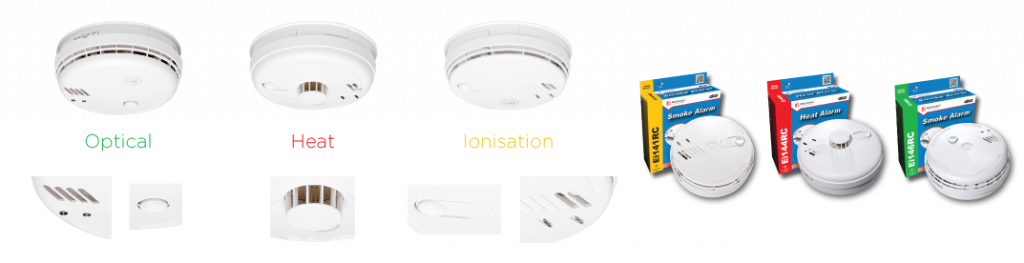
Single Sensor Smoke & Heat Alarms
These alarm are mains powered with differing types of battery back-up. There are three different alarm designs.
- The 160e Series – mains powered with 10-year rechargeable lithium cell back-up, compatible with RadioLINK+.
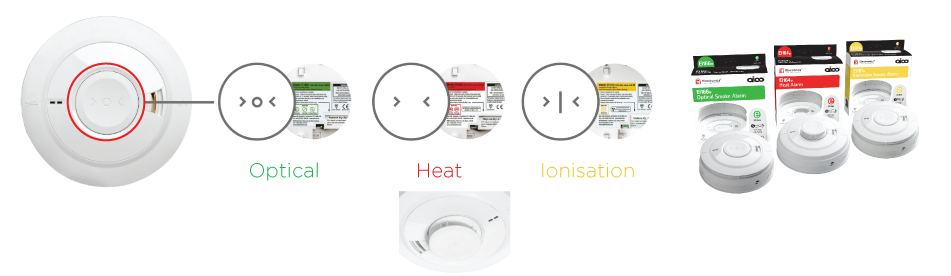
- The 160RC Series – mains powered with 10-year rechargeable lithium cell back-up, compatible with RadioLINK (no longer available for purchase).
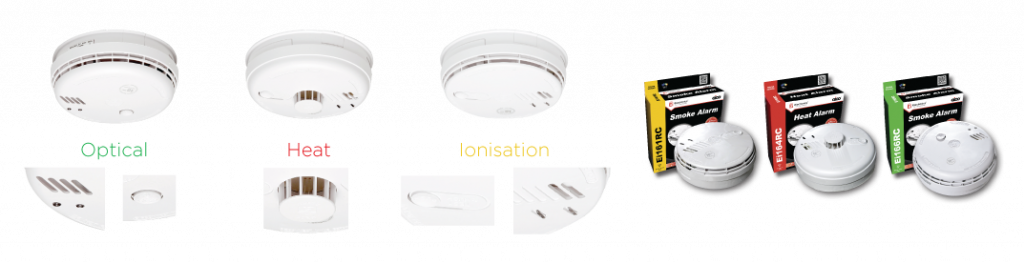
- The 140RC Series – mains powered with 9V Alkaline battery back-up, compatible with RadioLINK.
Carbon Monoxide Alarms
Mains Powered Carbon Monoxide Alarms – The Ei261ENRC and Ei262 alarms are mains powered, with a 10-year rechargeable lithium cell back up and contain AudioLINK data extraction technology. The Ei261ENRC is a standalone unit, whilst the Ei262 is compatible with RadioLINK.

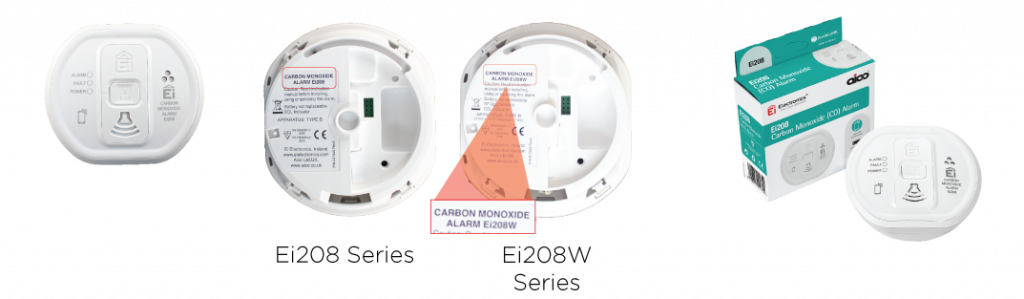
Battery Powered Carbon Monoxide Alarms – The Ei208 and Ei208W alarms contain a sealed in 10-year life lithium cell and have built-in AudioLINK data extraction technology. The Ei208 is a standalone unit, whilst the Ei208W is upgradeable to RadioLINK+ with a Ei200MRF module. Also available in this range is the Ei208WRF with built-in RadioLINK+.
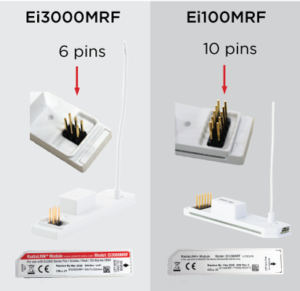
Which module do I have?
- The 3000, Ei2110e and 160e Series alarms all use modules to connect alarms with each other wirelessly using radio frequency signals.
- The 3000 Series use SmartLINK modules – Ei3000MRF.
- The Ei2110e and 160e Series use RadioLINK+ modules – Ei100MRF.
How do I replace my alarms?
This step by step guide will show you how to remove and replace the existing alarm heads in a property. If you have an easi-fit base fitted, all you need to do is replace the alarm as there is no need to remove or re-wire the base.
- Turn the mains power to the alarms off in the property and ensure the green indicator light on the alarm is off.
- Locate the flattened ‘T’ shaped slot on the side of the alarm, there will be a sticker and arrow pointing towards it saying ‘insert screwdriver to remove’.

- Insert a small flat headed screwdriver into the slot, angle the handle of the screwdriver down towards you slightly, and slide the head of the alarm away from the screwdriver.
- The alarm will then come down in your hand, you can then see the exact model number.

- Now to replace the alarm, align the unit up with the base plate and slide it into place. You should hear a slight clicking sound when it is in place.
- Turn the mains power back on and ensure there is a solid green LED showing.
- Now test the alarm by pressing and holding the test button on the front of the unit for 10-15 seconds. The unit should make an alarm sound and also activate any other alarms in the property.

All our current mains powered fire alarms will fit on the easi-fit bases including the Multi-Sensor Fire Alarm Ei2110e, 160e Series and 140RC Series, making it easier and quicker for new alarms to be installed.
If you are not able or comfortable replacing your alarm yourself, use an Aico Expert Installer – these are Contractors that have been trained by us in the selection and installation of Aico products. You can find your nearest Expert Installer through our website search.